Planning
- I used the Photo Pills app to figure out where the best spots might be for the transition of the moon. Mt inglasmaldie at Lake Minnewanka looked like a great subject as it was centered during the whole 5 hour span.
- I also used the ‘Windy app’ to look at potential cloud cover forecasts for the 5 hour period when the moon would make its full transition (from 7.30pm-12.30am)
- I had a back-up plan in case cloud cover came in and ruined part of the sequence since Windy actually showed quite a lot of cloud cover. The back-up involved a different location where I could get atleast some of the red moon phases (9.30pm – 10.30m) close to a mountain peak in one frame. That meant locations that were set deep beneath a peak because the moon was high in the sky by that stage.
- I observed the moon the day before the shoot to see where it was in the sky. It was a lot higher than I had hoped (make sure to also look at the moon height above the horizon shown in degrees on Photo Pills. This allowed me to know that I would be looking into compositing not only the moons but changing atleast half of the transition to arc downwards using Photoshop to get the result I had envisioned.
- It was winter so I had to be prepared to not be moving much at temperatures in between -10 to -15 Celcius for the 5 hours. This meant dressing for much colder conditions. I was prepared for -30 celcius. I had heat warmers in my boots and gloves as those are the places that get most uncomfortable for me on an idle winter shoot. Hot thermos of coffee, food, ice cleats for heading out onto the lake, bear spray in case I ended up alone the whole time (not for bears – but potentially for cougars), and two fully charged camera set ups with two tripods. A couple of contacts you can reach is also essential especially when heading out alone.
In Field Capture
Camera 1: Canon 5d MarkIII with a Canon 100-400mm LII Lens attached set at 400mm. Canon Intervalometer attached and set to shoot at intervals of every 3 minutes, bracketing 5 images every time in case I wanted to blend back some of the moon’s dynamic range (a thin veil of cloud held back a lot of the moon’s brightness causing a moon halo and due to this I lost some detail in the darker areas of the moon but as a benefit I didn’t have to do any blending for dynamic range).
I needed to adjust the exposure settings throughout the transition as well.
Settings:
I began at f8, ISO 200, and 1/200th second for the bright full moon at the beginning and end.
These values changed slowly over time to f5.6, ISO 6400 and 1/10th second during the darkest moments.
I didn’t want to go this far but I was at the absolute limit of what was acceptable image quality wise (See ‘Final Thoughts’ below for what I will do differently next time). Ideally since the moon is moving you would want your shutter speeds to be around the 1/100th of a second (definitely not any slower than 1/10th). Also ISO on this camera I don’t like using past iso 1600 (land) and iso 3200 (sky) unless using noise reduction stacking techniques so I was stretching at ISO 6400 but it was better than having a blurry moon. I was maxed out on Aperture for that lens as well.
I also needed to re-adjust the composition manually to track the moon about every 10 minutes. I would simply place the moon in the bottom left third of the frame and after ten minutes it was in the top right of frame, repeating this process throughout the night. This meant I could have some freedom to operate the other camera to find and shoot good foreground compositions especially when the sky went completely dark and the stars came out during the blood moon phase of the transition.
Note: Manually focus on the edge of the moon and make sure you double check its still perfectly focused throughout the night. I must’ve bumped the lens at some stage as I lost focus for a short section of moons so luckily I was checking every so often.
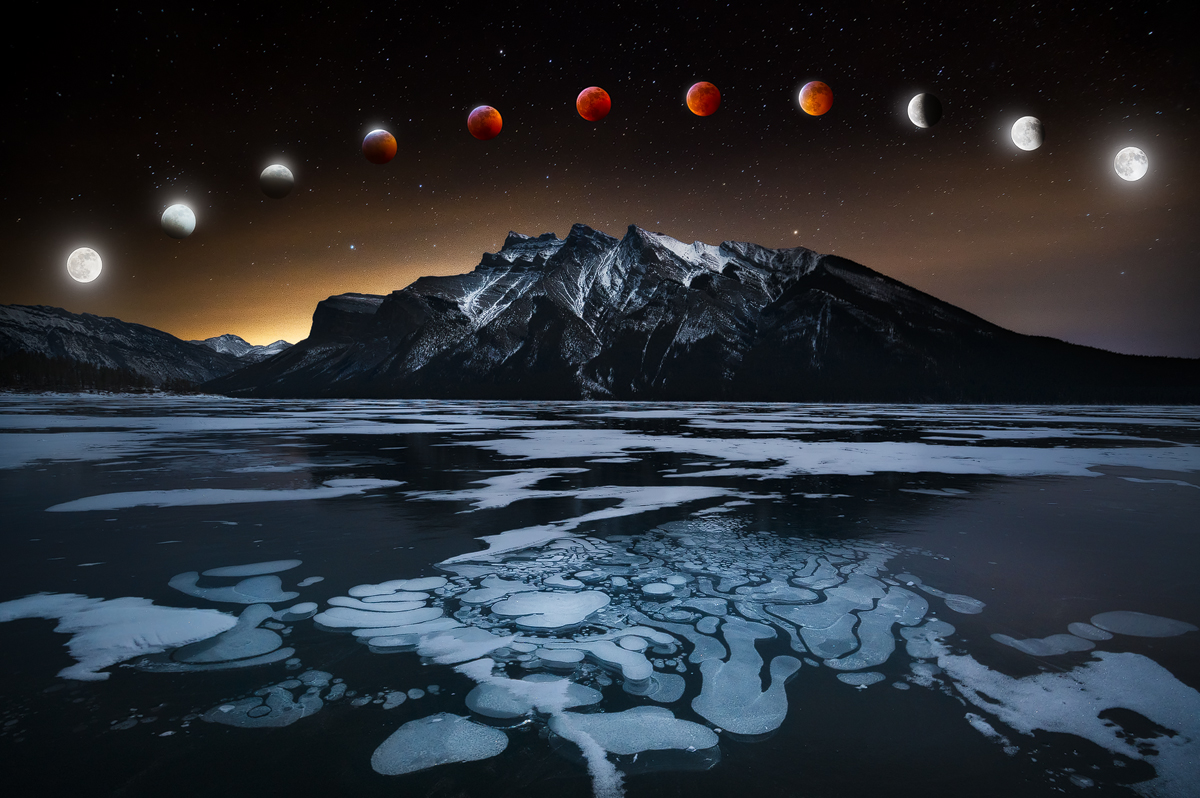
Camera 2: Sony A7RIII with a 16-35 L f4 Canon lens adapted with Sigma MC-11. I knew I wanted to shoot the sky when the stars came out strongly around totality (10.12pm) and use a focus stacked foreground during the half moon phases to get some definition and dimension to the landscape with the moonlight but not too much so it could appear like it was captured during the sky phase (Hey if you are doing a composite go all in!). I had pre-scouted this particular bubble patch at sunset and chose it as it had a connecting piece of snow like the letter “S” in the middle ground which brought the whole scene together and leads the viewers eye in.
Settings:
Sky: 16mm, ISO 1600, 30 seconds, f4 for the sky.
Land: 16mm, ISO 800, 30 seconds, f4 x3 focal points for the ice and mountain focus stacked.
I would’ve used my f2.8 16-35mm lens but it was being serviced. That would’ve allowed using iso400 or a faster shutter speed for more pin-point stars. On this camera it doesn’t matter as noise quality is well controlled to much lower ISO’s than these.
Post processing
This can be daunting but break it down and remember its a composite image based on reality so you have a bit of flexibility and creative license.
1) Start with blending the sky into the focus stacked foreground. You should have 4 layers in Photoshop at this point = starry sky + 3x focus stacked foreground
Blend your dark starry sky image with your half-lit foreground image which was focused on the mountains (Hopefully you didn’t move the tripod as it makes things much easier). These should be perfectly aligned as their focus point was the same: infinity. I used the simple ‘quick selection’ tool to select out the sky and then added it as a mask. I then refined the edge of the mask to make it fit better. I then manually went in with a brush and finessed the blend to make it look natural as some area were looking unnatural and I also zoomed in to 300% and fixed any glaring errors in the selection.
2) Now once the blend looks good move along to blending in the other 2 focus points in the mid and fore-ground (You may need even more focus points depending on your aperture value and closeness to the foreground). Select all your layers and auto-align them first due to the focus breathing that you will have encountered. Then manually brush on a layer mask with a 100% hard edged brush to reveal the more focused parts of each image. As long as brightness values didn’t change you shouldn’t be able to see the blend. You may need to go back in with a soft edged brush to finesse the blend in places if its obvious. Click the mask on and off to see and zoom in to really find where those focus transitions were.
3) Great! Now we are ready for the moons (The hard part)!
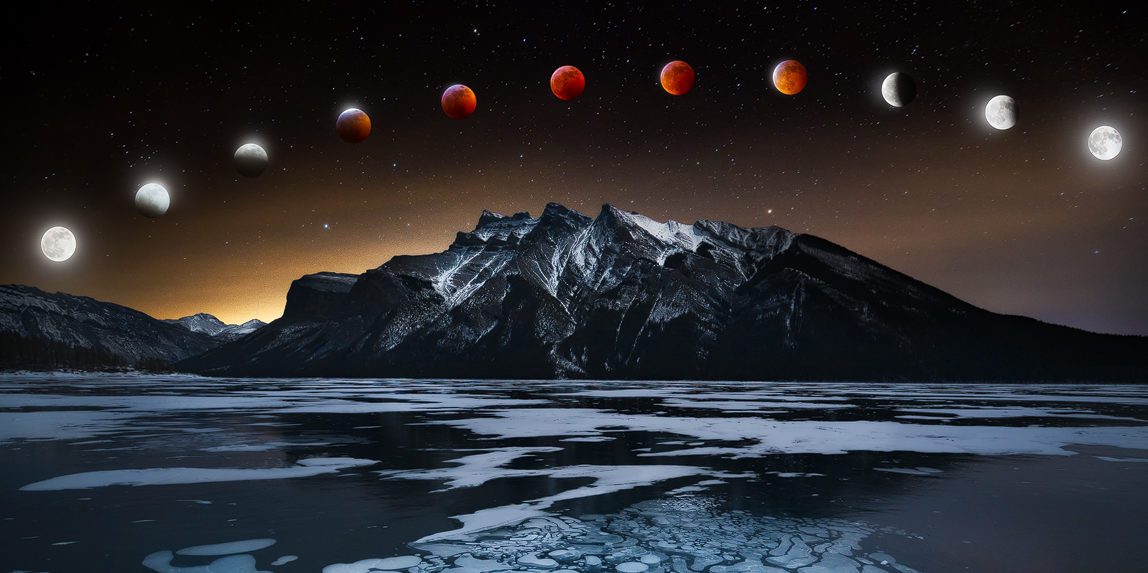
I had a LOT of moons to choose from so I picked the best ones at evenly spaced intervals. I used Lightroom to do a lot of the organization, flagging and starring to narrow it down to the final 11 moons that were used. Luckily I also got the exact timing for the 10.12pm fully eclipsed blood moon so I used this one as my central moon since it was actual totality (according to the time on my camera).
Make initial adjustments in your RAW editor and then open those layers in Photoshop overlaying them over top of your foreground image. I resized all of these moons to the exact same size using the transform tool and placed them equidistant in an arc above the mountain. I then began by using the blend if sliders to eliminate most of the darkness around the moons followed by brightening, color grading and adding glow to each moon as needed. This was a complex task to make a seamless result and beyond the explanation of this blog. Zoom in and manually fix errors. Quick selection was very useful along with refining the edges.
A dark sky helps with the integration of the moons into the scene.
4) Once I had all moons placed and blended I edited the image as I would any other night image, performing some noise reduction, some complimentary color work making sure the ice showed cyan to pair well with the blood moons and subtly emphasizing the light pollution glow on the horizon. I localized contrast into details I wanted to be seen like the bubble structure and the moonlit mountain edge and I made the stars pop a little more using some luminosity masking. I de-saturated some areas to simplify and give a more natural look which gives the saturated blood moons more chance of integrating as well.
5) Some thoughts on processing colors at night can be found here – https://www.mountainphototours.ca/2018/12/14/night-photography-color/
That’s it! Lots of work but I’m happy with the result! Can’t wait for the next total lunar eclipse on May 26th 2021. More information here – http://www.mreclipse.com/Special/LEprimer.html
Final thoughts
- Hire a better lens (wildlife lens with a faster aperture) for the next time as it got challenging during totality to maintain image quality on this lens due to its f5.6 aperture at 400mm.
- Use a tracking mount to make sure the moon is centred throughout the night to take advantage of centre sharpness of the lens and not have to adjust it at all.
For night photography tours or workshop specific instruction to learn more about night photography in Banff National Park and the Canadian Rockies book here https://www.mountainphototours.ca/year-round-photography-tours-in-banff-canmore-alberta-canada/ or contact me via email with your request! I am available year round and as you can see here great night shots can be made in winter with good preparation!
Also sign up to hear more behind the image breakdowns, photography workshops and tours in the Banff area via my mailing list below.